SceneSense combines GoPro control, live preview, and local object detection in a Qt Quick application. Moving that application onto a Raspberry Pi adds another problem: the device needs a coherent operating system around it, including graphics, wireless connectivity, video codecs, model runtime, and startup behavior.
I created a separate Yocto project to describe that system and generate a matching SDK for application development. The target is Raspberry Pi 4 with a 64-bit Linux image. The aim is to make the board boot into SceneSense while keeping everyday C++ and QML development practical on a workstation.
Two related builds with different jobs
The application project owns the interface, camera workflow, and detection pipeline. The system project owns the Linux distribution configuration, package selection, application recipe, and boot services.
This separation creates two useful development loops. A system build changes the environment on the board: libraries, drivers, services, or image configuration. An SDK build changes the application against that environment. Adjusting a QML layout should not require recreating the whole SD card image, while changing a runtime library should be reflected in both the device and its development SDK.
Giving each build input a defined place
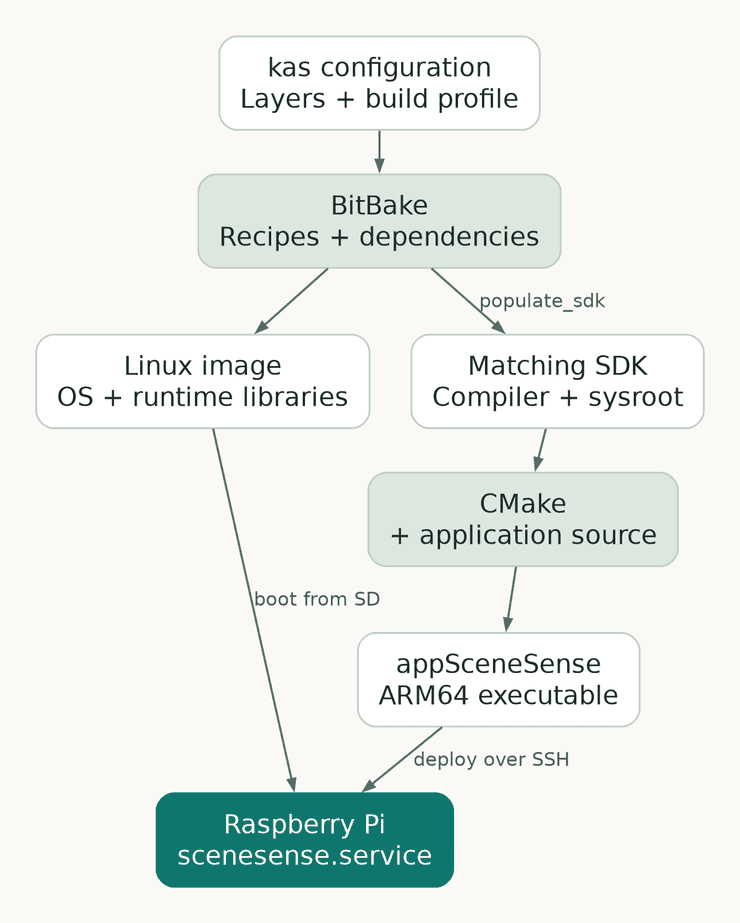
The project uses kas to assemble the layer repositories and select a build profile. Its YAML configuration describes the inputs, and an accompanying lockfile records exact layer revisions. A container launcher selects the build environment and keeps generated sources, downloads, and build outputs inside the system project.
BitBake recipes then describe what to fetch, compile, package, and install. My meta-scenesense layer contains the distribution settings, image recipe, application integration, and kiosk configuration. The Raspberry Pi support and Qt integration come from their corresponding layers.
There are two separate revision boundaries. The kas lockfile pins the layer and build-tool repositories. The application recipe pins SceneSense and its BLE and GoPro libraries independently. Updating the application revision does not require moving the operating system layers; updating a layer does not silently select a newer application checkout.
This makes changes to the build inputs explicit and reviewable.
What goes into the device image
The image is assembled around the application's actual needs:
- Qt Quick and its runtime plugins provide QML rendering, controls, and image support.
- EGLFS with DRM/KMS provides the direct display path for the fullscreen interface, without an X11 or Wayland desktop in this configuration.
- BlueZ and NetworkManager provide Bluetooth pairing and Wi-Fi management for the camera connection.
- OpenCV and GStreamer receive and decode live video and supply the media support used by the application.
- LiteRT provides the CPU inference runtime used by the object detector.
- systemd starts and supervises the application.
Packaging this stack required more than adding the executable. The image includes the relevant QML, SVG, network, and video plugins, plus actual font files. A Qt font library alone does not give the board glyphs to display. NetworkManager owns network configuration, and the alternative network service is disabled to avoid two managers competing for the same interfaces.
I also disabled unused GStreamer features whose dependencies did not fit this display configuration. For example, the image does not need GStreamer's SVG overlay support when Qt already handles the interface's SVG assets. This keeps package choices tied to the application instead of inheriting every optional feature.
Booting into the application
The application package installs appSceneSense, its model assets, and scenesense.service. The service selects the EGLFS platform, starts the interface at boot, and restarts it after failure. Persistent application state and temporary runtime files have separate locations.
A small kiosk package suppresses virtual-terminal login prompts on the display. Together, the display configuration and service turn the board into an application-oriented device instead of a desktop that needs a user to launch a program manually.
The current bring-up service runs as root. Moving it to a dedicated user needs explicit access to the graphics and input devices and the appropriate D-Bus permissions.
An SDK that matches the board
A desktop compiler and desktop Qt installation cannot supply the target environment for an ARM64 executable. The SDK therefore includes a cross-compiler, target headers and libraries, and tools that execute on the development workstation. Its target sysroot is the reference filesystem used to resolve the board's dependencies during compilation and linking. This is the standard role of a Yocto cross-development SDK.
I added an environment wrapper and a CMake toolchain file to the application project. They load the SDK configuration and keep desktop Qt paths from leaking into the target build. Desktop and Pi builds use separate build directories so their generated files and object code are not mixed.
LiteRT illustrates why this boundary matters. In the current system integration, a Yocto recipe builds the CPU runtime from source and installs it in the image and SDK. SceneSense uses system-runtime mode to link against that target library. It must not accidentally find the workstation's runtime or package a second, incompatible copy.
The result is one dependency contract: the application is built against the libraries that the device image provides. When that contract changes, the image and SDK need to move together.
Development and production profiles
Both profiles share the layer and application revision selections, but serve different purposes.
The development profile includes SSH, debugging tools, and application debug symbols. It also carries preview settings intended to limit display conversion work and inference frequency on the Pi. It permits empty-password root login for bring-up, so that access must be changed before using the image on a shared network.
The production profile builds the application in Release mode and removes the development SSH server, debug tooling, and passwordless-login features.
Updating the application without rebuilding Linux
For application work, the SDK produces an ARM64 executable from the local SceneSense checkout. The deployment helper transfers it and the model files over SSH to a board running the matching development image.
The helper stages the files before stopping the service, preserves a backup of the installed version, installs the update, and restarts the application. It checks that the service remains active without restarting for a short interval and restores the backup if installation or startup fails. This checks startup; camera connection, rendering, and inference still need functional checks on the device.
There is an important release distinction: an SDK deployment uses the local application source, while a fresh image uses the application revision recorded in its recipe. Before producing the next image, that recipe must be updated to include the intended application changes. Otherwise, reflashing can replace a newer development build with an older pinned version.
What this adds to SceneSense
The system project connects the application to its execution environment: display, radio services, media stack, inference runtime, boot behavior, and development tools. The matching SDK keeps application iteration separate from the slower system build while preserving the dependency boundary between workstation and board.